 You may think that your poor, beleaguered homeschooling house is stuffed to the gills with crayons and science kits and puzzles and stores of curricula. And you are probably right. I have a ton of tips to share to help you store all the homeschooling paraphernalia. So many tips, in fact, that I have divided them up roughly by subject. I will cover one each Monday and today we start with art supplies. We will take a break from Downloadable Mondays for a few weeks, but rest assured – I will get back to it.
We started out in a moderately small house. Then we ended up with sons and daughters, which meant that after a certain age they really needed separate bedrooms. We staved off that time as long as possible, even dividing their shared bedroom with shelves and curtains. But it was inevitable and much to the sorrow of my husband, who loved our bedroom painted in the soft yellow hews of a glorious sunrise, with a sleeping porch that looks out over our wonderful green backyard. And so we our master bedroom furniture into the family room and spent the next 7 years working at it until it finally feels like a bedroom. Part of the way through that period of adjustment, we lost half of our new familyroom/master bedroom to a couple of student desks and shelves of curricula as I foolishly thought that in order to homeschool my children, I would need a space resembling a school. About a year later, I wised up about homeschooling and the husband and I got custody of the whole master bedroom/family room again.
That left a conundrum – where should all the school-related equipment and supplies be stored? All the closets were already full, as was the attic and the basement. And the husband dearly wished for a dining room and a living room that functioned as they are named, instead of storage areas for various art projects and history timelines.
So I began a quest to find hidden storage.
And my goal this week is to start sharing them with you in hopes that I can save you the time it took me to find these hidden spaces in any home. Today we begin with art supplies.
Art supplies are really the most bulky of the homeschooling subjects. They range from pens and colored pencils to tempra and oil and watercolor paints and include all the forms of clay and glue that you could imagine. I took the colored pens and markers and colored pencils and make them openly available for the kids to easily access, along with a supply of paper. This way any of my kids can grab marker and paper when the artistic juices are flowing. I have found that the process of hunting for art supplies kills my kids’ creativity and 9 times out of 10, they will just wander away and say, “nevermind,” if I need to hunt for paper for them. Also making as much as possible into self-serve activities helped my kids to nurture independence, self confidence, and responsibility.
The other art supplies are segregated by type of material in our house. While I am writing this post I am sitting at our kitchen table on benches that have built-in storage boxes under the seats. That is where I store construction paper and other large papers like the kind you use for finger painting and tissue paper. It is kind of a mishmash in there, but it doesn’t matter since the kids and I know that is where those types of papers are stored and the lid shuts away the disorder from sight. Below the bench, on the floor, I store boxes with extra supplies of tempera paint (I think we have enough to last the next five generations without trouble) and paint boxes with oil and acrylic paint. Also anything big or bulky that relates to science or art that has no other home in the hidden storage spots lives down under the kitchen benches on the floor. The great thing is that with the table in place, no one ever sees how much is down there and yet it is easy enough to pull up on cleaning day so I can get to the floor under the bench.
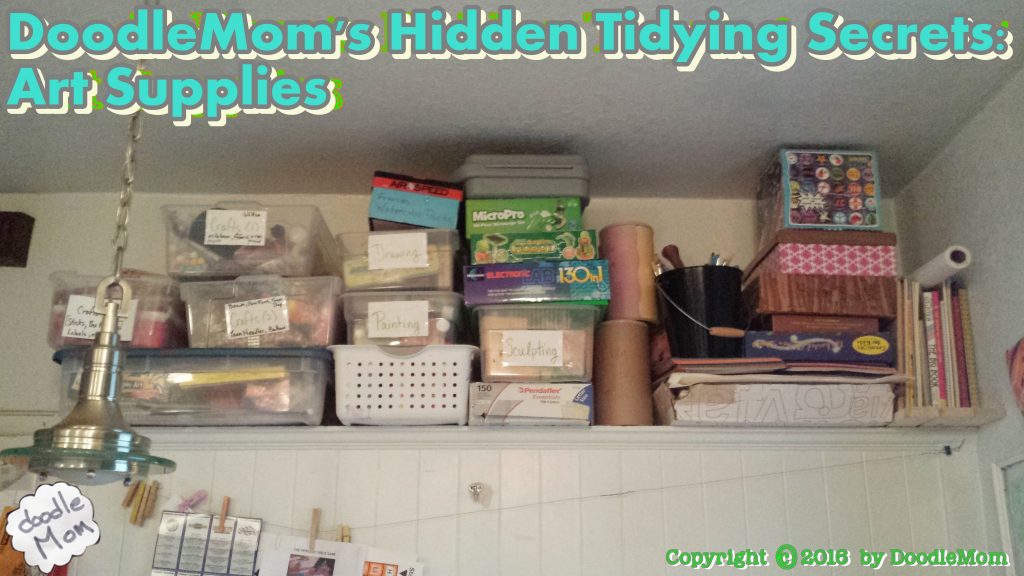
Our house is an old one, over a hundred years old, and is blessed with oddness in our kitchen that is the backside on the built-in in the dining room. That means there is a six foot long and 2 1/2 foot long ledge about 7 feet up in our kitchen table nook area. On that I have stored all the other art supplies. I bin them by type so that when we do an art lesson, I can just grab one bin and some paper and I have it all prepared and ready. I put painting in one bin, drawing items in another, sculpting in a third, and then there are two bins with crafting items that range from pompoms to glue guns.
Placing the bins and coloring books and art pads above eye level in bins that are labeled means I can easily grab them when we need them and yet the room does not appear nearly as cluttered. The kitchen actually looks like a kitchen and not an art studio, unless we are in the middle of a lesson.
After you do an painting project, you are faced with a huge number of wet and sticky papers. I solved this by hanging them to dry with clothes pins hung on picture hanging wire that I string about the edges of my kitchen, using existing towel hooks and the ends of curtain rods. Then when the art is dry, I can take down the picture wire and wind it up and keep it in the kitchen drawer.
That is pretty much it for my art storage secrets. The take home messages are: first – use the storage you already have in new ways, second – use bins to store art materials and label them, and third – feel free to make an art mess with your kids.
Art is Messy and Good Art is even Messier. The secret is to do it in a place that is easy to clean afterwards and have the places set up to store the materials it so it is easily accessible. Then your kids and you will have so much more fun with homeschooled art!
